How To Build A Swing Set In Your Backyard: My <$350 Project
 I’ve wanted to build a swing set in the backyard for years, but it kept getting pushed to the wayside. When the boys were little Mrs. C. and I had bought one of those standard small metal swing sets that you self assemble as a big Easter present for the kids. I like the idea of an all in one kit, but 1 size doesn’t fit all and as the boys got older they outgrew it. I wanted to build a swing set for my kids that would last for over a decade and could handle the weight of older teenagers and adults. A swing set will be the perfect addition to our backyard playground, which currently has a tree house, a monkey bar set, a rock climbing wall, and a Gaga ball pit!
This swing set is substantially larger, stronger and will last way longer than a similar priced metal “All in One Kit” you can buy on Amazon. I’m thrilled that I finally got to build a swing set for the kids! Please read through the entire article before starting your swing set build. I wrote this as I was building and made several mistakes along the way. I wrote this article so more kids could get a swing set in their yard, and also so that others can learn from my mistakes.
Planning To Build A Swing Set:
 I had first planned to build a swing set that was fully custom, however this would include me cutting perfect angles, and well, that just isn’t my strong suit. I decided to buy special bracket for connecting 2 4X4 posts to a 4X6 top post. Upon looking into this further I found a set that included these brackets, all the connecting hardware, and 2 swings, requiring the user to purchase the wood separately. I figured this would take a lot of the guess work out of the project, and boy was I right! This eliminated some potential headaches and it allowed me to order 1 item and then buy the wood and concrete at Lowes.
The swing set kit I bought suggests using 8′ long 4X4 posts and a 9.5′ long 4X6 top post. Since I want to make this big enough for all 4 kids to use at once I decided to go with a 16′ long 4X6 top post. I also wanted the swing set to have more height so I replaced the 8′ long 4X4s with 12′ long 4X4s. Supersized! The marginal cost of increased lengths of wood is well worth it to be able to have all the kids use the swing set at once. If you’re going to build a swing set build it right and build it to last.
When going to a larger size some math is needed to maintain the spacing. The original plans are for 3 swing places on a 9′ 10″ 4X6 beam. Since I decided to go with a 16′ beam I needed to do the math to determine the proper spacing. I thought about going for 5 places, but decided the extra spacing between the kids would be ideal and I made this swing set a 4 place swing set.
I started with a 192″ beam.
4 swings at 18″ is 72″.
To keep even spacing on the sides, and even spacing between each swing place I needed to subtract the 72″ from 192″ to get 120″. Since I have 2 spaces on the exterior of the outside swings and 3 spaces in between the swings, I need to divide this 120″ by 5, which gives me 24″.
For this swing set we start with a 24″ gap, then have an 18″ swing, then 24″ gap, then 18″ swing, and so on. This gives us a much larger gap between the swings than in the original plans.
Because this is a large build that will remain in place for a long time I also did some measuring in my yard to ensure that not only will I have plenty of room for the frame, but also plenty of room for the swing distance and for kids jumping out of swings.
Swing Set Material and Tool List:
Build A Swing Set Material List:
- Eastern Jungle Gym DIY Kit
: $209: This included 2 A-Frame Brackets for Swing Set with All Mounting Hardware
, 3 sets of 2,400 pound swing hanging brackets,
2 swings
, a trapeze bar, and 4 ground anchors.
- 4 (4X4X12′) Pressure Treated Posts $54.22 (Edit: This is what I used, you should use 10′ posts and learn from my mistakes. More on that later.)
- 1 (4X6X16′) Pressure Treated Board $29.37
- 5 80# bags of concrete $22.80
- 10′ of additional chain and 4 quick links $22.37
It is important to use pressure treated lumber since this lumber will be outside and will have ground contact. It is well worth the slight price increase to go with the correct lumber when you build a swing set. You don’t want to have to rebuild in 5 years because you used the wrong lumber.
Total Required: $337.76
This is well worth the price. As you can probably tell from my other 300+ articles on this site, I’m really focused on my money. For every dollar I’ve spent building these toys in my backyard my kids have gotten 10X that in enjoyment. The tree house I built for around the same cost 7 years ago is still used all the time. If this swing set lasts for 10 years, I’m effectively paying only $33.77 per year for it. Divided across my 4 kids that’s $8.44 per kid per year. The decision to build a swing set certainly has a strong economic case. Having a backyard playground has also proven invaluable during the Corona Virus lock down while we are currently not allowed to go to parks.
Tools Needed:
-
- Sledge Hammer
- Shovel
- Socket Set
- Tape measurer
- Drill w 2 batteries
- 1/4″ Drill bit
- 3/8″ Drill bit >6″ long
- 2 2X4 boards
Note: I save 5% on all my purchases at Lowe’s as a Lowe’s Pro Amex card holder. The card has no annual fee and in addition to the 5% discount I also earn 2 points per dollar spent that I can redeem for gift cards, effectively giving me a 7% discount on my purchases.
Safety Considerations For Building A Swing Set:
Safety is a major concern on this build, especially with going bigger than the original design. Lumber is heavy. Pressure treated lumber is heavier. A 16′ long 4X6 pressure treated board weighs around 112 pounds. Add in that it is being installed on top of 12′ posts and you have a ton of potential energy.
The swing set kit instructions do not state to concrete the structure into the ground, but I felt better about safety by doing so. The swing set kit I bought did come with ground stakes for support, but I would prefer to spend the extra money and go with concrete. I will use the ground stakes on another project. After I assembled the swing set I dug 4 holes at the corners and filled with concrete. For added stability I also put in 2 2X6 cross braces on each side.
Potential hazards:
- Pinch points when loading and moving lumber – watch hand positioning, wear gloves.
- back strain when loading and moving lumber – Get help! Use tools, a simple cart can make all the difference.
- slivers: Once again, use gloves.
- Dropped object, foot damage: Dropping a 112 pound piece of wood on your toes is a bad day. Wear steel toes.
Getting Started Building A Swing Set:
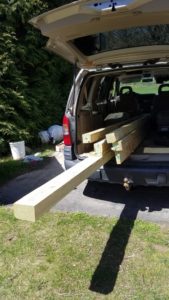 Me being the stubborn man that I am went to Lowes and loaded up all my lumber myself. It is during a pandemic and we are social distancing though. Ideally I would have had someone else help me. A 16′ long board of any dimension is a pain to move and a 4X6 beam that weighs over 100 pounds is certainly no small task to load and unload. My 2000 Pontiac Montana is an excellent work truck. Those boards are pushed up to the front dash board in the picture. The 16′ beam is sticking out about 5 feet. I have a short drive from Lowes and I didn’t have any issue with the load shifting or wanting to fall out the back.
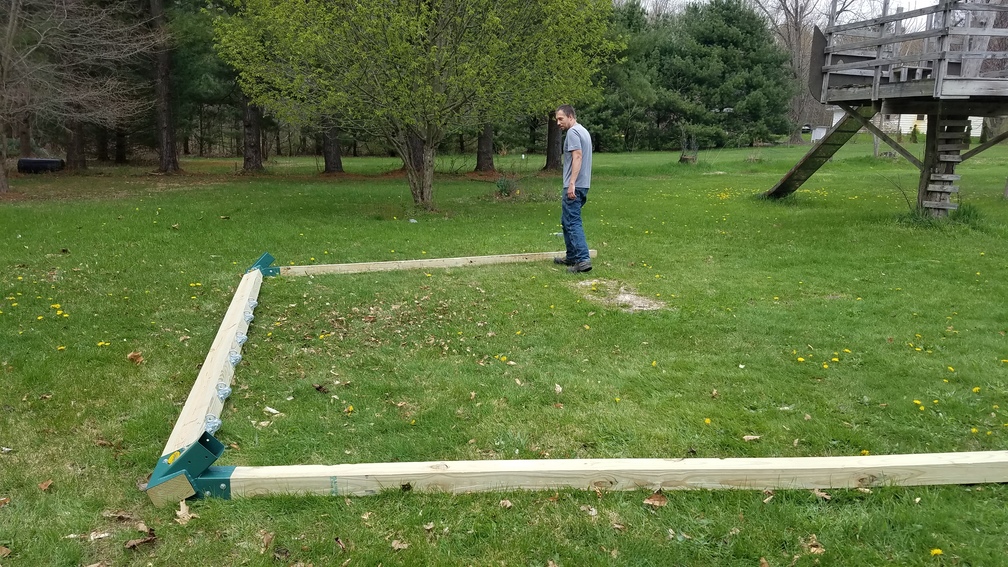
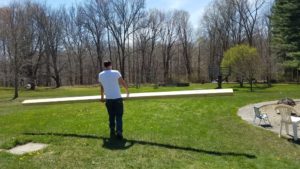 Once I got to the house I unloaded all the lumber and carried it back 120′ to the middle of our backyard at the job site. The 4X4s weren’t so bad, but once again, I should have got some help with the 4X6. I found its center of gravity and carried it out there. After doing this I thought of multiple ways I could have moved it. I could have had someone else help me lift it. I could have strapped it down to my appliance dolly. I could have moved some stuff out of the way and drove my van into the yard to unload the lumber. Something to think about when you choose to tackle this project.
After gathering all my materials the first step to building a swing set is to install the swing brackets on the beam. This is much easier to do on the ground than off a ladder later on.
 I measured out the spacing I discussed earlier and drew a line at each spot along the way on the 4″ wide bottom of the beam. These lines are where the brackets for the swings will go. I centered the brackets on these lines, then used my pen to put a dot through the bolt holes on the brackets. These are the spots to drill. I drilled from the bottom of the beam to ensure that if I didn’t drill perfectly straight, the holes would still line up with the brackets. I had to use a 12″ long 3/8″ drill bit to drill the holes. I drilled the holes about a third of the way then backed the drill out to remove the material, then drilled to 2/3, removed the material, then finally drilled all the way through.
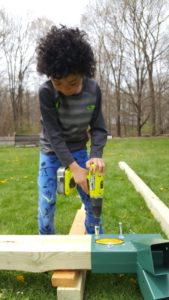
 After drilling the holes I installed the 3/8 bolts that came with the set through the beam. It was too tight of a fit to just slide the bolts through, so we used a drill. My nephew then put the brackets in place and tightened the nuts down. It is really important to install a washer on each side so that the bolt doesn’t slip through.
At this point it was getting latter in the day and we took a break. We hadn’t started until the early afternoon and spent under 2 hours on it the first day.
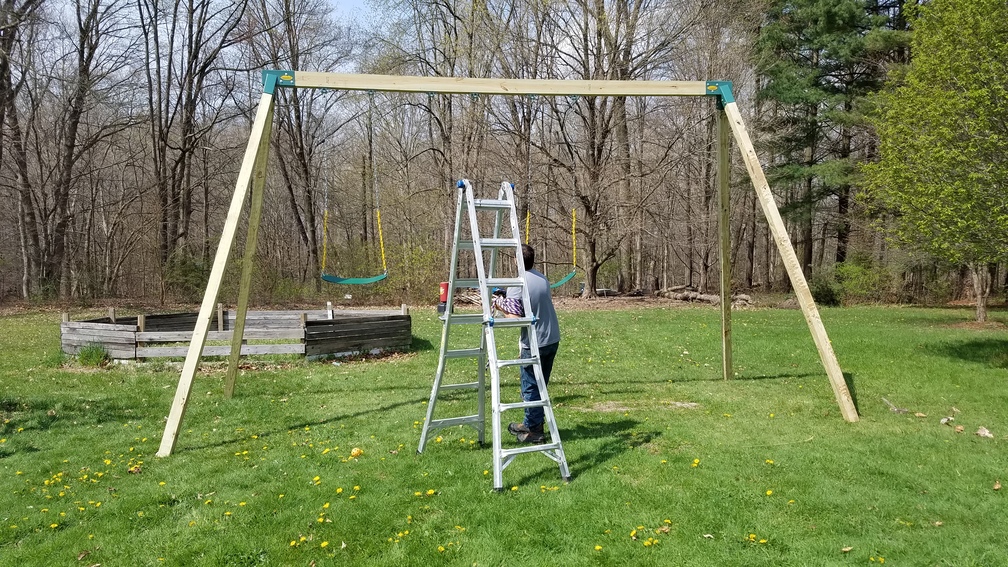
 The next morning we attached the swing set brackets
 to the 4X6 beam. Here is what I call “Mistake #1” The instructions that came with this set were lacking and I stopped using them almost immediately. The instructions state to first Attach the 4X4 support posts, THEN attach the beam to the posts. This is important because if you attach the beam first although it is fairly manageable to get the first 2 4X4s in, the next two are almost impossible, since the beam is attached and we now have a structure with almost 200 pounds of weight to move around and flip. Otherwise you have to put the 4X4s in at a downward angle instead of flat, which once again is really hard to do. When I ran into this issue Mrs. C. asked me “What did the instructions say?” Doh! She already knew I went off the playbook.
To recover from this mistake We had to flip the structure over, then Mrs. C. and my 16 year old had to hold the first 2 4X4 supports up so that I could install the other 2 4X4s on a level plane with the ground. I could get the 4X4s started, but since they were 12′ long they ended up too high in the air for me to effectively and safely pound them into place. I also needed to put a couple boards under the bracket to make it fully level. Fun was NOT had by all. I had to get it lined up and started, then beat them in with a sledge hammer. So please, attach the bracket to the 4X4s first, then install the beam.

Additional Helpful Hints To Build A Swing Set:
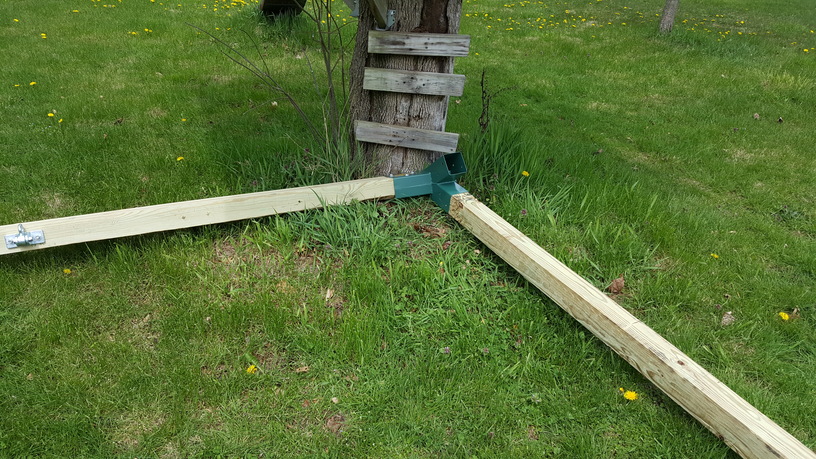
Getting the 4X4 posts lined up is key. There is zero play with these brackets. Once lined up and you have it started, then beat them in with a sledge hammer. I set the bracket against a tree to give back pressure and this worked well.
When installing the bracket on the 4X6 beam you can also use a sledge hammer. I took a 2X8 board and put it over the bracket as a striking surface so I would not damage the edge of the bracket while forcing the beam on.
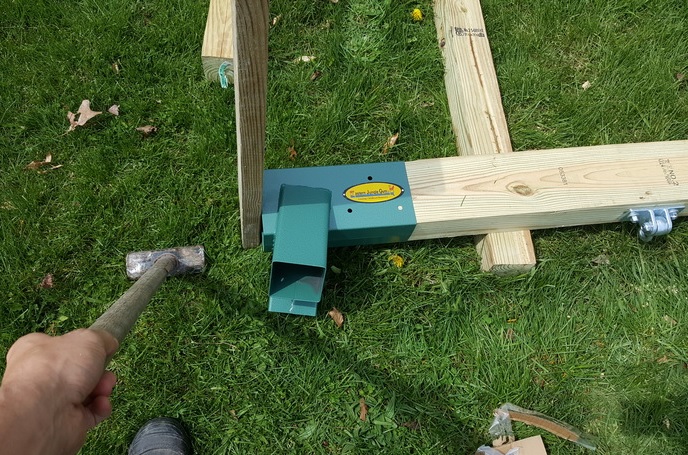
NOTE: Yours should not look like this! Attach the 4X4s first, then attach the 4X6. The same method with the sledge hammer and blocker piece of wood should still be useful.
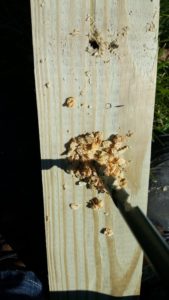
When you get to putting the bolts in it is imperative to drill a pilot hole. You need a 1/4″ drill bit that is 4″ deep. I also made a mistake here and broke off my drill bit in one of the holes. I beat the bracket to the side 1/2″ and redrilled the holes with a new bit. After drilling the pilot holes you can install the bolts. Each bracket has bolts on 2 sides.
Lifting A Swing Set Into Place:
At this point we have a fully assembled swing set frame, but it’s resting on the ground!

OKAY…I can figure this out!….maybe…
Alright, Point of safety: This build weighs over 350 pounds. The main beam weighs 112 pounds, each 4X4 weighs 58 pounds each, for a total weight of 344 pounds before adding in the weight of the brackets connecting the lumber and the brackets for the swings.
I thought for sure I could think my way out of this and “figure it out” after all, it’s all physics right? With a big enough lever I can move the world! Well not so much. Mrs. C. did take some pleasure in me not being able to figure it out. I tried to make a lever with a big rock and a 2X4, then snapped the 2X4. I then tried a metal post, and it bent. Leverage was not the answer.
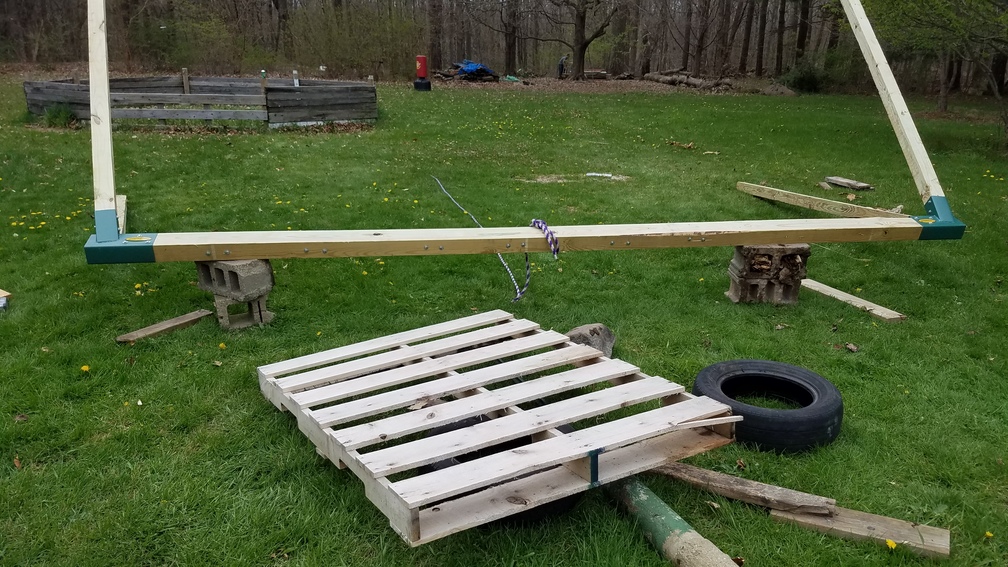
Step 1: I went in about 1/3 of the way on each side and lifted the main beam up a bit over a foot and I had Mrs. C. slide a cinder block under it. I continued this until I had 3 cinder blocks stacked up. This gave room to lift from under the beam.
Step 2a: Step 2a was once again me trying to figure this out. I thought I could lift in the middle and someone else could pull a rope tied to the top. This was a bad plan and was quickly aborted. You can not do this by yourself. I think its even a stretch for 2 people to do it. Theoretically I could have dug a deep hole, installed a 16′ 4X4 in it and concreted it into place, Then I could attach a double block and tackle between the center of the main beam and the 4X4 post. THEN I could pull up the swing set, and then remove the 4X4 post. Theoretically. We did not go this route due to time constraints and the probability that we would have ran into additional issues.
Step 2: You NEED 4 people. Here’s what actually worked. My father in law and sister in law came over to help. I had 2 2X4 boards about 6′ long to assist with this process. 2 people were on each side. My father in law and I both lifted each side up on the 4X4 legs. Then Mrs. C. and her sister wedged the 2X4s between the legs of the swing set and the ground to relieve the pressure. This allowed us to change our grip on the legs and “walk it up”. Without doing this you can’t tip it over because you are not tall enough. So every lift we pushed up about 2 feet and the girls reset the 2X4s to take the weight. It took less than 2 minutes to get the thing upright. Unfortunately I don’t have any pictures of this because it was all hands on deck to get it raised.
OOPS: This thing is too tall! I should have used 10′ legs instead of 12′ legs. 10′ legs would have also made standing this up a lot easier and getting the legs installed much easier as well. About 10 minutes after my father in law left he called and asked me if I was going to concrete the legs in because he was uneasy about it being a flip hazard. My wife got a good laugh out of this because if her dad thinks something is sketchy its probably super super sketchy. I had already planned to concrete the legs in, but I just want to reiterate that this is not an optional step. Do not rely on the ground stakes that came with this set when you have made the swing set taller and wider. Actually I would concrete it in regardless, even if I followed the instructions to the T.
What is this??? A swing set for giants?
Attaching The Swing Set to the Ground:
The swing set came with 4 ground stakes. These are fairly substantial and I think would work well if this swing set were built to its original design plans; 4′ shorter legs and a 6′ shorter beam. There is no way these would be sufficient for the changes I made to this build.
I dug a hole a few inches in front of the legs about 18″ down and over a foot in diameter. I then inched the legs right next to the hole. There is a couple inches of play allowed from the brackets to do this. I actually had all of the legs resting partially over the hole. I then pulled one leg forward into the hole and all 4 legs fell right into the holes. I was actually surprised at how well this step went. Because I dug all the holes fairly wide and all to 18″ the swing set ended up level.

I bought 5 80 pound bags of concrete and I also had a bunch of broken up concrete from a previous job. I mixed the concrete in a 5 gallon bucket and mixed about 20 pounds of aggregate with each hole. Each hole ended up somewhere between 100 pounds and 125 pounds to anchor the swing set down. With the concrete poured I made sure there were no gaps. I set the concrete a few inches below the ground line so that I can install the turf on top of it once the concrete is cured.
After the concrete set I reinstalled the turf that I pulled up from the holes. I threw in some extra dirt and cut the turf around the 4X4 posts. It now looks like the swing set was always there and the grass goes right up to the 4X4 legs.
Adding Strength:
I bought 2 2X6 boards to connect each set of legs together. In addition to connecting the legs together and providing additional strength they also are a canvas for adding in rock climbing holds. I have some left over rock climbing holds from when I built a rock wall 2 years ago and thought this would be a nice bonus for this swing set. Whether you convert the sides to a rock climbing wall or not, you still want to brace them. You can also use a 2X4 for this. I used 3.5″ exterior deck screws for this.
Mistake #1,537? After I complete the swing set and had it in use for a few days I notice the beam had some back and forth sway in it when multiple kids were lined up at the same time. I’m now thinking I did make this too long of a span. In retrospect for a 4 place spacing Instead of leaving 24″ between each swing I could have put 18″ spacing between each swing and reduced the span by 2.5 feet. Having a 13.5′ span would be much stronger than a 16′ span. But it’s too late for that now! I did some research and read that the strength of the beam relative to its height is cubed, not linear, so adding 2″ of height to the beam would effectively double the strength of the beam. At least that’s my interpretation. Any engineers or pro builders who would like to chime in, please share your knowledge!
I decided to add a 16′ pressure treated 2X4 to the top of the beam which I secured with a bunch of 3.5″ exterior decking screws. First I measured and drilled holes with a paddle bit for the bolt heads for the swings to ensure the 2X4 would sit flush on the beam. Then I installed the 2X4 with 1 screw roughly every foot. This greatly increased the strength of the swing set and greatly reduced the back and forth movement of the beam. I am confident it is safe now. I may add another 2X4 for extra margin, but if you follow my advice and build a swing set that is 2.5 feet shorter across then 1 2X4 across the top should be more than enough.
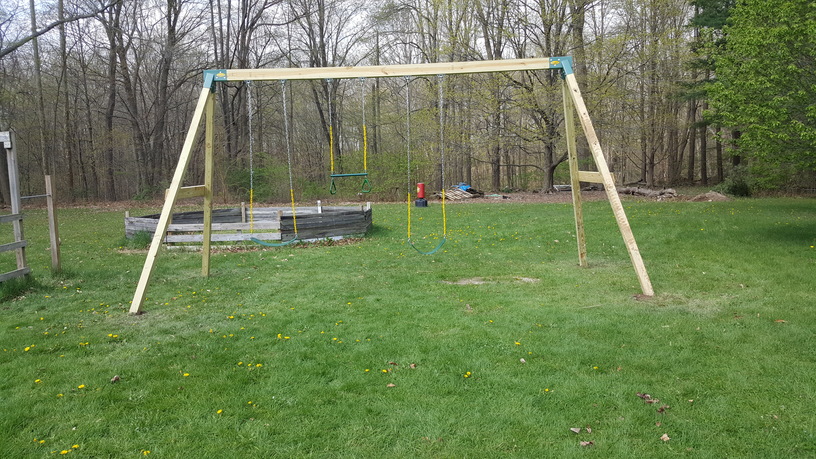
Note: The new 2X4 installed on top. WOW, what a difference a week makes! The trees in the background certainly filled out with leaves quickly!
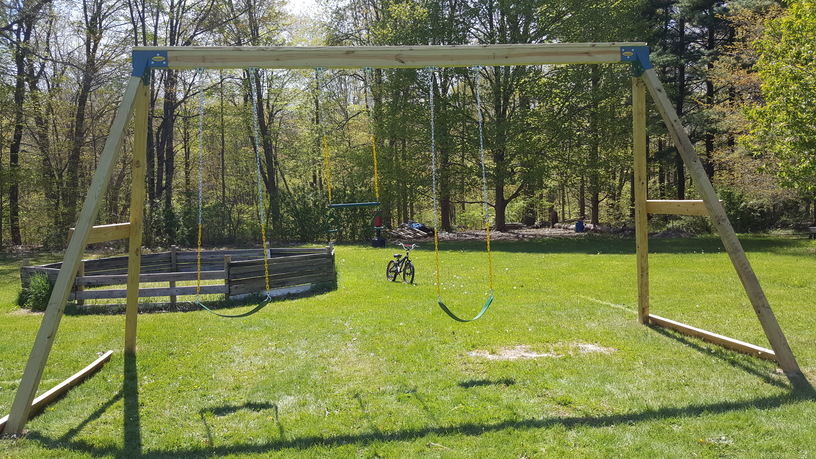
Installing The Swings:
Since this is taller than the design I had to add on some length of chain to the swings. I took the 10′ chain I had bought from Lowes and cut it with my angle grinder to 2′ sections. I added 2′ with a quick link to each chain to lower the swings down. Now the swings are adjustable, since I can set the height in any chain link. I set 1 swing a bit higher for the taller kids. For reference the top beam ended up being 9.5 feet off the ground.
Other Lessons Learned:
My eyes were a bit too big for my stomach on this one. I should have built with 10′ legs and not 12′ legs. I also could have made this a bit narrower. I built it 16′ wide planning on having 5 swings. When we decided to go down to 4 I could have cut down the beam at least a foot, maybe 2, which would have made it even sturdier. I also need to learn to ask for help earlier. I spent quite a bit of time trying to figure out how to lift this swing set by myself when having an extra set of hands made it a million times easier. Mrs. C. says I also need to follow written instructions. I can do it at a nuclear plant I need to do it in my outside of work life as well.
So If you build a swing set following this guide use 10′ legs instead of 12′ legs and cut down your beam from 16′ to 13.5′.
Conclusion
I am super proud of this swing set. This swing set is industrial. It is solid. All my kids can use it, and so can Mrs. C. and I and any other adults. I have no doubt that this swing set will still be here in 10 years. I bet my grand kids will play on it. This swing set is versatile as well. At any point we could switch out the swings for a tire swing, or another flip bar, or even a porch swing. We could tie a rope to the top and have a climbing rope. There is a lot you can do with this! It’s 16′ long, allows for 4 people to use it at once and is over 9′ tall. I’m glad I had the swing set brackets for the framework instead of cutting angles myself. I feel a lot more confident about the strength of this build due to the brackets.
To complete my swing set I still need to buy 1 more set of 2,400 pound swing hanging brackets. I had a swing installed on a tree branch that I have ready to install once the new bracket gets here. This will give the swing set the 4 places I built it for. For now we plan on having 3 swings and the trapeze bar installed that it came with, however at some point we may swap out the trapeze bar for another swing.
What do you think of my swing set? Are you ready to build a swing set in your backyard after reading this and learning from some of my mistakes?
Leave a Reply