How To Build A Rock Climbing Wall: My $200 Project
Rock climbing walls are probably the coolest addition you can make to your backyard. They are fun for kids of all ages and they challenge both our brains and muscles. I had wanted to build a rock climbing wall for our kids for the past couple years, but I had some doubts about the best way to do it and about my abilities to safely build a rock climbing wall. Originally I thought that building a rock climbing wall would end up costing us over $500, which is the primary reason I had delayed this project for so long. Here’s a detailed step by step approach to how I build a rock climbing wall in our backyard for under $200.
 Planning To Build A Rock Climbing Wall:

I thought about building a special framework for our rock climbing wall and putting it as an addition to our tree house, but the cost was prohibitive. I decided instead of building a wall from the ground up to use an existing wall that I had. Many people have cinder block garage walls that they could build off of. On our property we have a cinder block lean to shed that has a large cinder block wall. It runs 20 feet in length 11 feet high. I decided to build here instead of building a rock climbing wall from the ground up. Since most rock climbing walls are built as stand alone items and are attached to wood instead of concrete, this build became quite a bit easier. No digging holes, pouring concrete or using a level required!
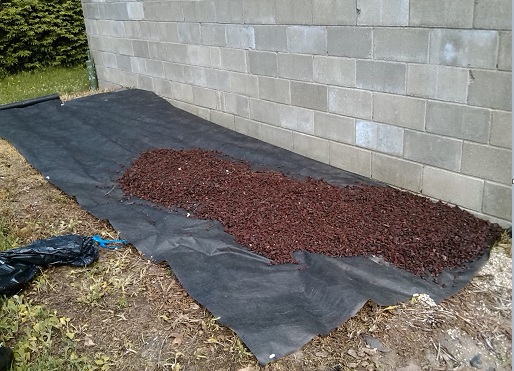 It’s also important to consider fall safety when building a rock climbing wall. At a minimum ensure that there is not a hard surface under the wall. Concrete and asphalt are extremely unforgiving. I would like to think this is basic common sense, but someone may not be thinking about the potential for head injuries when building their rock climbing wall. Our oldest son has had a couple serious concussions and we try to keep a keen eye out for preventing head injuries. Last summer in preparation for building our rock wall I started looking on craigslist and garage sale site for rubber mulch.
Materials and Tool List For Building A Rock Climbing Wall:
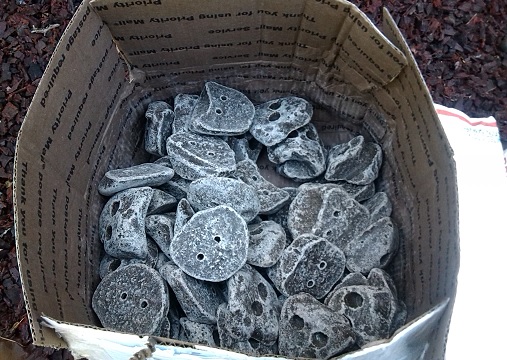 There are two different types of rock climbing holds; screw on and bolt on. For a rock wall utilizing an existing cinder block or concrete wall, you would want the screw on type rock climbing holds. The best holds I found were these:
50 Screw on Climbing Holds on Amazon.
I really like that these holds look like natural rock. I don’t normally care much for aesthetics, but these look so much better than the brightly colored holds. They also feel like actual rock. When attaching to concrete block the proper screws to use with these holds are 3/16 Tapcon Masonry screws with a 5/32 masonry drill bit. You can get a box of 225 of these 2 1/4″ long for $34 at Lowes.
I use my Lowes Business credit card when buying any supplies at Lowes because it has no annual fee and gives a 5% discount at the register. Anyone can set one up here for their business account. Mrs. C. and I recently started a rental property business and this card is indispensable.
Materials:
- 50 Screw on Rock Climbing Holds
.: I ordered these off of Amazon. Depending on the size of your rock climbing wall it may make sense to buy fewer. They also have sets of 10 and sets of 25 available. I went ahead and expanded my initial wall and got a second set of 50 rock climbing holds.
- 225 3/8 Tapcon Masonry Screws: These are also sold in packs of 75 if building a smaller wall.
- (3) 5/32 Masonry drill bits (Included with screws)
Tools and Equipment:
- Extension cord: For plugging in the hammer drill.
- Plug in hammer drill: I have a cordless hammer drill, but with how many holes I’m drilling I think a corded drill will provide more power and longevity.
- Cordless drill: This is just for driving in the Tapcons.
- Ladder: You need to be lined up to install these and to be lined up properly you have to be at a height where you can actually see what you are doing.
- Safety glasses: Concrete dust in the eyes is bad.
- 1 kid for spacing: Our 4 year old had a lot of fun doing this and he loved that he got to help with building the rock climbing wall.
Spacing the Rock Climbing Holds:
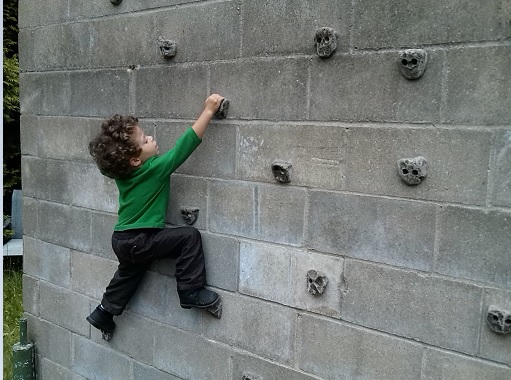 Spacing the holds is actually the most difficult part of the whole process. I started off using our youngest kid as the measurer for where to put holds. I started one foot hold at a height that was a bit of a challenge for him to reach to, likewise the first hand hold. I then had him climb up and reach out from there. Where he reached to I would mark and then start the next hold. I tried to adjust the spacing a little as I went to make sure it didn’t look too repetitive. I wanted the holds to appear somewhat random, rather than being exactly evenly spaced in a grid.
The Rock Climbing Hold Installation Process:
 For the site setup I ran an extension cord from our power supply to plug in my hammer drill. I brought out my cordless drill, my box of Tapcons and my adjustable ladder. I of course also brought out my box of rock holds. Our youngest who just turned 4 came outside to help me. You certainly want to be wearing safety glasses when drilling into concrete. The slightest change in the wind can blow concrete dust right into your eyes.
1. Once I decided where to place a rock hold I took out the hammer drill and started one hole. The concrete drill bit should go through fairly quickly.
2. Then I would hold up the rock hold I planned to use and use the drill the mark the second screw hole. After that I would take down the rock hold and drill out the second hole.
3. The third step is holding up the rock hold and using the cordless drill to run the Tapcons into place on both screw locations. Out of the 200 screws I installed about a half dozen ended up not working properly. Whether this was due to the hole not drilling right, a manufacturer defect, or a user error, I’m not sure. If the screw did not tighten all the way down and there was still some play in the hold I would undo that install and try again with fresh holes.
4. Once I installed the rock hold I would then test it out by climbing on it and putting all of my weight on it.
5. The final step was to have our 4 year old use the hold and reach out to the next location where we need a hold.
Cost Breakdown of My Rock Climbing Wall:
- 50 Screw on Rock Climbing Holds:
- 225 3/16 2 1/2″ Tapcon Screws: $34
Total Cost: $184 plus later expansion of $150 = $334.
Afterthoughts on Building A Rock Climbing Wall:
Honestly, this was super easy to do. I spent a total of less than 10 hours building this thing. I was originally really worried that attaching to concrete would be super difficult, but it wasn’t. I honestly wish that I had done this years ago. I really like building outside toys for the kids that require them to work their muscles. This is why I built a monkey bar set for them 2 years ago. This came together really well.
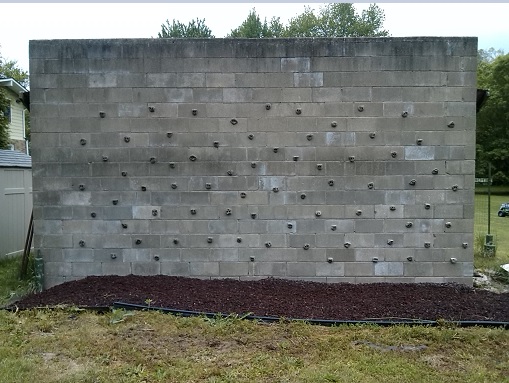
This rock climbing wall has a really nice horizontal run, but what it lacks is a vertical incline. I would like to add one of these on the right side of the wall down the road, most likely it would be either a 4′ or 8′ stretch. I will update this article if and when I add that in. Another addition that I would like to make is a climbing pegboard above the rocks. I would need to attach a 12 foot long 2″ X 12″ with holes pre-drilled. This would have to be at the 9 foot mark to be above the rock holds. I think this would be a really fun addition for me and would be fun and challenging for the kids as they get older.
I like this climbing pegboard at Amazon
It was difficult for me to find information about installing rock holds into concrete, because the vast majority of people install them into wood. Because I already had this wall available I was in a great position to turn it into a rock climbing wall. Another really cool option that installing rock holds into concrete presents is installing holds on basement walls. This would primarily work for younger kids due to ceiling height, and could be a lot of fun. I’d put down a couple layers of foam padding on the floor below the installation.
What do you think of this rock climbing wall? Any plans to build one yourself? If you liked this building project check out my new Gaga Ball pit and my article on how to build a heavy duty swing set for my kids.
Leave a Reply