We Finished Rental House #4! Our First True BRRRR
I really wanted to get a rental house when my fall outage season finished up so I could do a rehab while the kids were in school. Because of this desire I overpaid, but that’s OK, the numbers still work. I bought a 2 bedroom 1 bath home with a 1 car garage for $24,000. The house was listed at $27,900 and we put an offer in 3 days after it was listed.
We were in a good position to buy because we refinanced rental house #1 and paid off our Heloc in September. I was scheduled to finish working at my seasonal nuclear contracting job in early November and would be off work for about 3 months, perfect for a rehab. This house will be the first house that we fully complete the BRRRR method on. BRRRR stands for Buy, Rehab, Rent, Refinance, Repeat. The goal is to buy the house well below market value, rehab it to add substantial value, rent it out to generate cash flow, then refinance. When refinancing the rehab and the rental income should allow the property to appraise high enough to get your entire investment, and sometimes more, back at the closing. Then you repeat because all of your cash you put into the deal has come back to you.
The House:
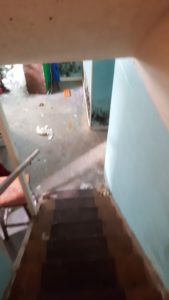
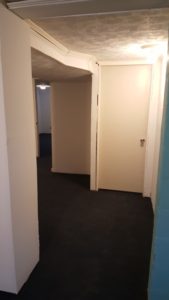
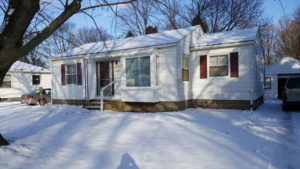 This house is just under 1000 square feet. It’s a 2 bedroom 1 bath with a detached 1 car garage. The basement is partially finished, with roughly 2/3 of the basement being finished with a concrete floor. It sits on a typical city lot in a decent neighborhood. It’s on a side street so there is minimal traffic.
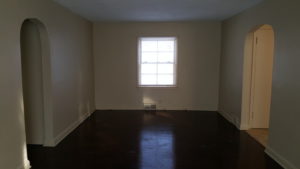
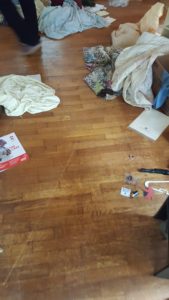
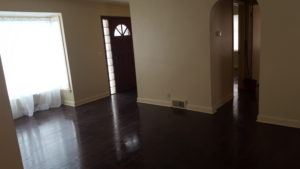
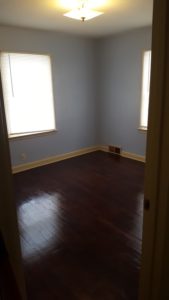
The Good: The semi-finished basement gives a great value-add opportunity to add a 3rd bedroom. The garage is highly desirable and a lot of rental houses in this city do not have a garage. The house has hardwood floors throughout.
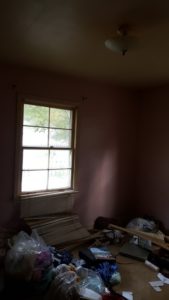
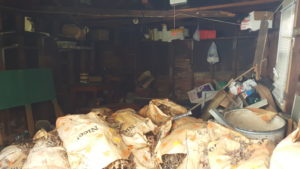
 The Bad: This house was a bank repo and the former owners left a ton of trash in the house. The house was smoked in heavily. The walls, the ceiling and the floor were embedded with smoke residue. I was actually surprised that the bank that owned the home didn’t pay a company to at least remove the trash to make the house look a bit more appealing.
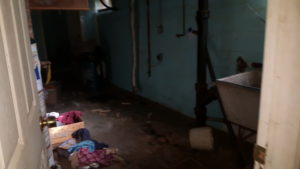
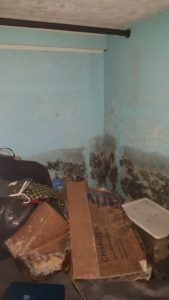 The Ugly: The big problem was mold. The finished basement had significant mold on the bottom 2 feet of the walls, with surface mold going the rest of the way up. The house smelled horrible. This was certainly the main concern we had with going after this property. Although I knew it would be a lot of work, I also knew that it would be a great opportunity because the mold would scare off a lot of other buyers.
Finding the House and The Showing:
I look at Facebook, Craigslist, and the MLS every day. When this house popped up on the market I wanted to see it right away. Mrs. C. contacted the listing agent within a couple hours of the house being listed and received no response. She gave him 24 hours, then went with a Realtor that a friend referred us to who showed it to us the next day.
Making An Offer: The house was listed at $27,900. I originally offered $20,000 for the house. I thought this was in the low ball territory, especially since it was just listed, but due to a substantial mold issue in the basement I wanted to come in low. I don’t think the bank was even aware of this issue. We offered an all cash, no contingency 7 day close. Unfortunate the bank received another offer and asked us to come in with our highest and best offer. We ran our numbers again and were comfortable with a $24,000 bid. In retrospect I think we should have held at our $20,000 bid, I think with our terms we had a really good chance of winning at the lower price. The bank accepted our offer. This is interesting to me because I have read a lot about REO properties and the process by which price reductions occur. It seemed like until the first official price reduction getting a discount of more than 10% was not possible. We paid 86% of list price, which puts a dent in this theory.
Closing:
This was by far the quickest closing I have ever been a part of. This house was a bank repossession and the bank was highly motivated to close before the end of the month. We closed on October 31st, just 6 days after the bank accepted our offer. I underestimated the motivation that banks have to close the books, especially to hit an end of reporting deadline. I will certainly use this to my advantage in future negotiations. We did the closing at the Realtors office. Our closing costs were $580 when factoring out property tax credits.
Work We Did:
- Filled A 20 Yd dumpster. We also brought 4 van loads of wood to our house to burn. We had 2 couches, a mattress, all the drywall we had removed, 2 rooms of carpet, and a bunch of trash the previous owners left behind. This dumpster was stuffed! We got a discount for filling it in under 48 hours.
- Removed Basement Drywall bottom 4′, cleaned all surfaces with mold killer 3 times, and defeated the mold! Mrs. C.’s dad has worked for a large mold remediation company for several years and gave us guidance on the process. I replaced all the drywall and painted the basement as well.
- Repaired plumbing: It looks like there was a water softener which was removed, so I plumbed the 2 pipes together. I love shark bites. We also had a leak going to one of the outside spigots. A good sign about the neighborhood is that despite the fact that this house was empty for over a year, the copper pipes were all still in place. Often any exposed copper pipes will be cut out and scrapped.
- Replaced Hot water heater: So far we have replace the hot water heater in every house we have bought, and probably will continue to do so. This one was installed in 2007, 12 years isn’t ancient, but we could tell just by looking at it that it was in failure territory, sure enough when we turned water on to it it leaked. Change your sacrificial anodes people! We spent a total of $550 on this. The water heater itself was $420, but add in new supply lines with a valve on the cold end, both needing shark bites, a new connection for the gas line, and a new flexible vent and the accessories they add up to over $100. Still WAY cheaper DIY that hiring it out.
- Replaced water meter: Mrs. C. had the water turned on the day we closed and they immediately found that the meter itself had cracked and was spraying water into the basement. This was most likely the moisture source that led to the mold. It cost $187 to have the water turned on and the meter replaced. WAY better than the $6,600 cost to get water at our last rental.
- Cleaned ceiling, walls: The people who lived here before were heavy smokers inside the house. Need I say more? We did 3 rounds of cleaning the walls and ceiling.
 Painted ceiling and walls: We sprung for the special ceiling paint this time. It’s a thicker paint and doesn’t drip like regular paint. We are spending a bit more on painting supplies these days to save us on the labor end. In the store looking at the $80 difference in price for 5 gallons looks like a big difference, but it is well worth it. I’m interested in looking into hiring professional painters to paint the entire interior of houses when we do a rehab if we can find a painting crew at a reasonable price.
- Removed carpet in 2 bedrooms: The carpet was disgusting and needed to go. Beautiful wood floors underneath! It sucks that when the carpet was installed they used about 5X the amount of staples needed to secure the padding. In 1 closet alone they used over 100.
- painted exterior window trim: We had 2 days where the temperature was warm enough for this and took full advantage.
- Repaired water damaged corner of the wall: We had one wall corner that had bubbled out from previous water damage. I cut out the bad bubbled paint and mudded/sanded down the area to prep it for paint, like it never even happened.
- Repaired garage rafters: The roof of this garage was in failure mode. A box of screws and some scrap wood brought it back to where it needed to be. The rafters were originally held together with nails and at some point they gave way and the rafters were now a couple inches too short to connect. I sistered them up and used 3″ exterior screws to attach. The structure is much more sturdy now.
- Cut up tree limbs:There were several large branches that had fallen down in a storm all in all I had 5 van loads of tree limbs that I had to bring back to our place to burn. We live out in the country and this rental is on a city lot, so a large fire would be frowned upon at best.
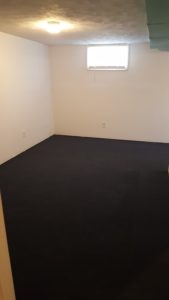
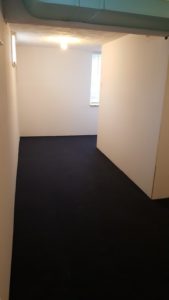
- Made a finished basement bedroom with legal egress window: This was the big value added project. A 3BR rents for about $150 more a month. This is pure profit. $1,800 a year in extra profit is well worth spending $1,000 to make it happen. I dug out the hole for the egress window and lined in a plastic modular liner. The opening needs to be a minimum of 3X3. I dug it 6″ deeper than the bottom of the new window to add in gravel. I was a little out of my depth on this one, thankfully my wife’s uncle has experience with installing these and assisted with cutting out the cinder blocks and installing the window. Cost breakdown: Saw Rental $71, Egress Window $345, Window Well $293, Framing and trim: $47, Wall framing and drywall to isolate bedroom: $206, 1 Clearance door: $26: Total: $988.
 Painted ceiling and walls: We sprung for the special ceiling paint this time. It’s a thicker paint and doesn’t drip like regular paint. We are spending a bit more on painting supplies these days to save us on the labor end. In the store looking at the $80 difference in price for 5 gallons looks like a big difference, but it is well worth it. I’m interested in looking into hiring professional painters to paint the entire interior of houses when we do a rehab if we can find a painting crew at a reasonable price.
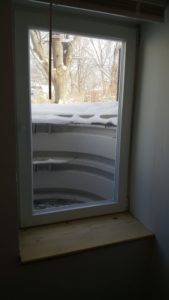 Made a finished basement bedroom with legal egress window: This was the big value added project. A 3BR rents for about $150 more a month. This is pure profit. $1,800 a year in extra profit is well worth spending $1,000 to make it happen. I dug out the hole for the egress window and lined in a plastic modular liner. The opening needs to be a minimum of 3X3. I dug it 6″ deeper than the bottom of the new window to add in gravel. I was a little out of my depth on this one, thankfully my wife’s uncle has experience with installing these and assisted with cutting out the cinder blocks and installing the window. Cost breakdown: Saw Rental $71, Egress Window $345, Window Well $293, Framing and trim: $47, Wall framing and drywall to isolate bedroom: $206, 1 Clearance door: $26: Total: $988.
- Replaced bathroom mirror and sink. I ran into some issues with the sink, we replaced it with a basin sink and this type of sink doesn’t have an overflow. Without an overflow the water going down the drain blocks air flow through the grate. I replaced the sink and then the water wouldn’t go down the drain! I found out that if you drill the holes in the grate out to 1/4″ it fixes this problem. I did this and also added an in line vent to the drain line and it the sink works fine now.
- Replaced the toilet: The toilet had a crack in the tank and was an elongated toilet. With this being a smaller bathroom every square inch counts. We got a used toilet from Restore for $35.
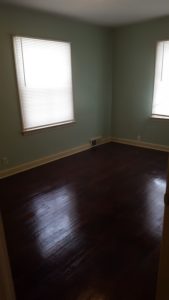
- Refinished wood floors: This was a new one for me. I had never sanded down wood flooring on this scale before. At our previous house we did a small bedroom with a palm sander. I rented a belt sander for $65 and an edger for $35 for the day and stripped the whole thing. I spent another $130 in sand paper to get the job done. Words of advice: 1. Make sure the chute isn’t clogged! When I first started the belt sander it got really dusty and I was leaving massive piles behind. Turns out the shoot that directs the dust into a bag was clogged. 2. Open windows! This will cut down on dust and noise. The sander is loud and in an empty house it is an echo chamber. 3. Wear PPE! I wore an N95 dust mask for most of the time. I did not wear safety glasses and earplugs which I totally should have. 4. Practice easing into and out of the cut with the belt sander. I never got the right feel for this and you can see the start and stop marks on the edges of the wall if you really look for them. I worked a 12 hour day to get the sanding done so I only had to pay for 1 day of rental. It took every bit of the the day to finish the job, The house has roughly 750 square feet of hardwood floors.
- We stained the 2 bedrooms, the hallway, and the living room the same. Mrs. C. did this and then did 2 coats of polyurethane. These floors although not perfect are a major improvement over what was originally there.
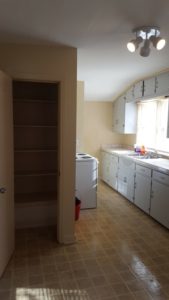
- Unclogged kitchen sink: This was a nightmare. When I took apart the sink I thought I immediately found the clog, the pipe was 100% blocked with grease and build up. I removed it and then tried to run an auger down the vertical pipe, no go. The entirety of the pipe was clogged with grease and not only did my auger not get it, but Liquid plumber max also couldn’t get it. We had to do 2 treatments of Drano Kitchen Granules to get it cleared, then we ran a lot of hot water, Success!
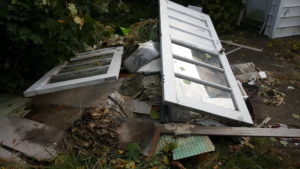
- Replaced the picture window: This cost $500 to have specially made. We wanted to save the old window but it was too far gone. The old one was made up for 9 roughly 20″ X 20″ panels. These were single pane, many of them were replaced with plexiglass over the years, and had tons of damaged or missing caulk. Moisture was condensing on the inside and rotting away the framing. The framing was too far gone to save. Mrs. C.’s uncle helped me with this window as well. A 64″ X 64″ picture window is REALLY heavy. I rented a U-haul to get it to the house since Lowe’s was behind on deliveries and gave me a delivery day almost 2 months out. The U-haul rental cost an additional $27. While I had the U-haul I used it to pick up all the drywall for the basement. Advice on moving a bunch of drywall: 1. Have a helper! Mrs. C. was recovering from her hysterectomy and couldn’t help much. She held the cart steady while I moved the drywall. 2 people makes a world of difference when moving drywall. 2. Use a drywall carrier. These plastic tools make a big difference. 4. Tear the strips and move 1 sheet at a time. 2 sheets of drywall is about 100 pounds, add int he awkward lifting angles and its a recipe for disaster. 5. Use your pro account perks at Lowes and have them pull the order for you. I didn’t know this was a thing. They will get the drywall pulled of the stack and on a cart ready to go for you if you call ahead.
- Added gutters: I added gutters to the backside of the house. The front of the house had gutters, but not the back. I also regraded the ground around the house with the dirt from digging out the egress window. No water getting in this house!
- Installed smoke detectors and Co2 monitors. I use the 10 year sealed battery smoke detectors. They last for a decade and no one “borrows” the batteries from the them.
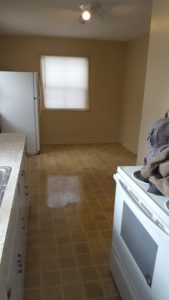
- Bought and installed a fridge and stove. Our local Lowes had a huge discount on scratch and dent appliances. I picked up the fridge for only $275. I also got a bit more of a discount using our Lowes Business AMEX card which gives us a 5% discount on all purchases at Lowes AND earns 2 points per dollar towards Lowes gift cards. For a no yearly fee card this is hard to beat, 7% total! We bought the stove during a sale for $430.
- Repaired Furnace: The furnace had a water leak through the heat exchanger and was another source of moisture in the basement. We had the heat exchanger replaced. This was one of the few things I hired out to a professional.
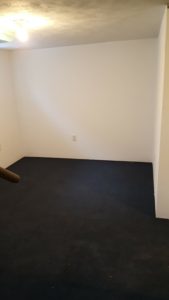
- Installed carpet tiles in the basement: At first I was weary of doing this. I didn’t want to put carpet in the basement for fear of water intrusion, however we have owned the house for 3 months with zero water intrusion. I used 18″ X 18″ carpet tiles, so I can replace only the damaged sections if they get damaged and each tile is only $1.98. We spent $540 on 612 square feet of carpet. Having carpet over a concrete basement floor is a big win. It feels a lot better and makes the basement look like fully finished space. Well worth the $540 and 2 days of work. This carpet is “sticky back” but it is not strong enough for attaching to bare concrete in my opinion. We bought 2 4 gallon tubs of carpet adhesive and used that to adhere the carpet. Since these are thin tiles you can not put any weight on them directly after gluing. If you step on them the glue will rise through the tile, they just need to be lightly pressed into the glue.
 Refinished wood floors: This was a new one for me. I had never sanded down wood flooring on this scale before. At our previous house we did a small bedroom with a palm sander. I rented a belt sander for $65 and an edger for $35 for the day and stripped the whole thing. I spent another $130 in sand paper to get the job done. Words of advice: 1. Make sure the chute isn’t clogged! When I first started the belt sander it got really dusty and I was leaving massive piles behind. Turns out the shoot that directs the dust into a bag was clogged. 2. Open windows! This will cut down on dust and noise. The sander is loud and in an empty house it is an echo chamber. 3. Wear PPE! I wore an N95 dust mask for most of the time. I did not wear safety glasses and earplugs which I totally should have. 4. Practice easing into and out of the cut with the belt sander. I never got the right feel for this and you can see the start and stop marks on the edges of the wall if you really look for
 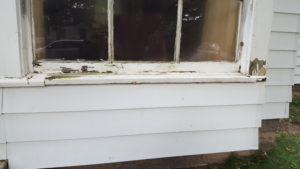 was too far gone to save. Mrs. C.’s uncle helped me with this window as well. A 64″ X 64″ picture window is REALLY heavy. I rented a U-haul to get it to the house since Lowe’s was behind on deliveries and gave me a delivery day almost 2 months out. The U-haul rental cost an additional $27. While I had the U-haul I used it to pick up all the drywall for the basement. Advice on moving a bunch of drywall: 1. Have a helper! Mrs. C. was recovering from her hysterectomy and couldn’t help much. She held the cart steady while I moved the drywall. 2 people makes a world of difference when moving drywall. 2. Use a drywall carrier. These plastic tools make a big difference. 4. Tear the strips and move 1 sheet at a time. 2 sheets of drywall is about 100 pounds, add int he awkward lifting angles and its a recipe for disaster. 5. Use your pro account perks at Lowes and have them pull the order for you. I didn’t know this was a thing. They will get the drywall pulled of the stack and on a cart ready to go for you if you call ahead.
More Before Photos:

More After Photos:

Costs/ Timeline:
We spent a total of $7,600 on this rehab for an all in cost of around $32,000. We closed on October 31st and finished the rehab February 14th. We put the entire cost on our Heloc and will refinance in May. We have to wait 6 months to do it off of a new appraisal. This house should appraise for over $55,000. At a 75% LTV that is a $41,250 loan. After paying closing costs we should be putting $6,250 in our pocket. Finishing a rehab with essentially no money in the deal and putting $6,250 in our pocket is a big win.
Past Bills:
The tax bill for the property was for the time period ended on October 31st, since we closed on October 31st we should have received a credit for the full cost of the tax bill. This would have been correct, except that there was a past due water / sewer / trash bill tacked onto the property taxes for a cost of roughly $1,300. I contacted the closing company and they sent a bill to the bank that sold me the house. Thankfully the bank was willing to pay for this and sent a check to the township 3 weeks later. Going forward I should include stopping by the township office and asking about any past due balances going onto the tax bills before executing a purchase.
Carrying Costs: With carrying the house for 4 months we did have expenses for utilities and interest on the heloc. I haven’t received the final bills yet but we are trending at $860 total in carrying costs. Adding in the prorated property taxes would put us at right around $1,000. Adding this into our rehab costs puts us at $33,000 total cost.
Taxes: This house is stupid over-assessed. I’ve honestly never seen anything like it. The house was assessed at being worth $76,000. I have a form set up to protest this and should get it dropped down substantially. I’ve been successful with getting my property taxes lowered several times so far.
Renting It Out:
We listed the house for rent as a 3 bedroom at $900 a month to see if we could get any takers. We list the house on Cozy.co which also syndicates to Realtor.com. We post on the Facebook marketplace, craigslist, and our own website. We also put a custom sign up in the yard. I was apprehensive since this is not the busy time of year for moving. Most landlords in this area try to avoid listing in the winter months.
Before we even listed the house we had three interested parties. Two had stopped by the house while we were rehabbing and gave us their information and another had looked at our last rental and called us to see if we had anything coming on the market soon. We had 10 people interested right after listing it and several of those were well qualified.
We signed a 12 month lease for $900 a month within a week of listing it. This level of interest was very encouraging to what we are doing. I’m excited to work on the next one, since this one will generate a lot of cash flow at $900 a month. We should also be able to raise rents in the future. Our cap rate on this property is 28%. When factoring in interest payments it is 23%. In 4 years this house will effectively pay for itself. In addition to us making a good profit off of this house, we also are providing housing for a family that was struggling to find a house to rent. The parents have 5 kids and although it is illegal to discriminate based on family size, it still happens. Their current apartment had recently increased their rental rate substantially and the apartment complex had seen a rash of violence over the past year with multiple murders. They exceeded our income requirements and were ready to move ASAP. some of the interested parties in the house needed to wait until mid March or April to execute a lease because they were waiting for tax refunds.
We spent a total of 14 weeks on this project. This was longer than what a normal rehab will be for us because of several factors. We had Thanksgiving and Christmas in the mix, a tenant who broke her lease on another property and caused damages that needed over a week to repair and rerent, and Mrs. C. had 2 surgeries. All of these items combined took about 7 weeks away from work on this project. In General a 6 week timeline should be adequate for most of our rehabs going forward, especially since most houses won’t have a finished basement that needs fully redone.
Know Your Value:
I keep my fingers on the pulse of rental prices in my area. I take detailed notes on virtually every property that comes up for rent so that I have a clear idea of where I should list my properties. In my area there is one large property management company that lists their houses at very low amounts. I’m sure this allows them to choose from dozens of applicants, but it also greatly cuts cash flow to their clients. They told a friend of ours who was looking into having a 3 bedroom managed by them that they only rent 3 bedroom houses for $650 a month.
This makes my competition priced well below where I am at, but at the same time if there are 100 people who want to rent a house, 80 of them may be willing to pay $650 a month, while 50 would pay $800, 20 would pay $850, and 10 will pay $900. I only need 1 to pay my rate.
This is especially interesting when you consider HOW property management companies are paid. They are typically paid a flat fee of 10% for managing a rental property. To them renting a house at $650 instead of $900 only drops their yearly income by $300, but they are costing their clients $3,000! Another reason to self manage. This management company has over 300 houses under management, with several home owners who have dozens of properties. Can you imagine having 20 properties that were each rented at $250 too low? That’s $5,000 a month, every month of cash burned.
A friend of mine 20 minutes up the road listed his 3 bedroom house for $700 a month and had over 100 people contact him within a couple hours. He should have listed it at $1,000 a month. He had the headache of dealing with 100s of applicants and cut himself $3,600 a year in profit. You can ALWAYS drop the price. It makes sense to test the market to see if you can get a higher rate. It is NOT ripping people off or taking advantage or renters to seek a higher rate. You are providing an alternative to their current situation and the higher rate you are charging may still be a better deal that what several other people have right now. Just because another landlord has a lower price doesn’t mean you’re house isn’t worth more. They can be short changing themselves, either on purpose like the property management company, or by accident like my friend.
What do you think about this house? Are you investing in rental real estate, why or why not?
Leave a Reply