How We Financed And Rehabbed Our 3rd Rental Property
 In May we closed on a 3 bedroom house on half an acre that we paid $20,000, bringing us to 4 total houses. Over the past 8 weeks we have fully rehabbed this house, spending another $12,000 to get it to where it needed to be. Our current goal is to expand to a total of 10 rental properties over the next 5 years, concentrating primarily on 4 bedroom and 5 bedroom houses. If you’ve been wondering why my posting schedule has been light this summer, you have your answer!
Financing:
Last fall we took out a heloc on our primary residence to act as temporary funding for rental property purchases. We were really conservative on the amount and our entire heloc line with our mortgage balance is roughly 60% of the value of our home. Because we have paid down so much on our primary residence we have the cushion available to use our heloc for temporary funding. This allowed us to make a cash offer which is much more appealing to sellers. We paid $20,000 “cash” through our heloc and had $430 in closing costs.
The 2nd step is to refinance our first rental property and then clear out our heloc which has funded both our 2nd rental and our 3rd rental. Our first rental property was our first home which we have owned for 13 years. Currently Mrs. C.’s mom lives there and covers the mortgage payment, which is about half of what market rate rent is. We bought this house as a more practical home for her and it allows us to make far more money net on rental income. On our first rental property we owe under $18,000 on it and it is worth right around $100,000.
With a cash out refinance at 75% LTV that gives us a 15 year $75,000 loan at 4.5% interest with a payment of $574. This $75,000 pays off the $18,000 current mortgage, pays off the $23,000 from rental #2, the $32,000 from rental #3, and the closing costs for the transaction. By doing this I have 1 mortgage and 1 set of closing costs on 1 property that still has a 75% LTV and keeps 2 of our rentals free and clear. This house is a 5 bedroom 2,400 square foot home that should rent for around $1,100 a month. We plan on having it rented out by the end of the summer.
The fair market rents for our 3 houses are $1,100 for our first rental, $650 for our 2nd rental, and $800 for our 3rd rental, for a combined gross income of $2,550 against $574 in a mortgage payment. With that being said our 3rd rental will still be rented at less than fair market rate to Mrs. C.’s mom. This house is a lot more practical for her. It is a 3 bedroom instead of a 5 bedroom, it has half the square footage, which should translate into half the heating cost. The windows are all new double paned locking windows compared to single paned 1940s windows in her current house. The house is pretty much all one level instead of 2 stories. It also only has neighbors on 1 side. Her current house has neighbors on both sides and behind her. This house also has central air which is a big plus.
The House:
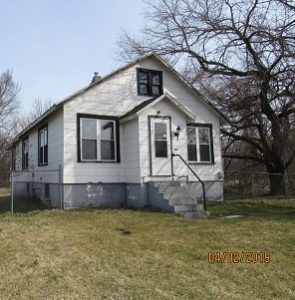
This house was listed at $23,000 back in April as a foreclosure. We offered $20,000 cash and the bank accepted our offer. This is one of those situations where in retrospect I feel I should have offered less. It had only been on the market for 3 weeks so I figured they at most would give a 10% discount, but since they accepted my initial offer of a 15% discount I think they may have been more open to a larger discount.
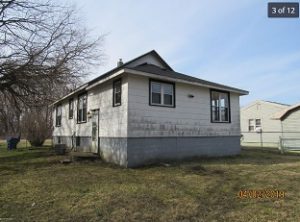 The house was originally a 2 bedroom house with a kitchen and living room that was built in the 1940s and then had a 2 room addition put on sometime in the 50s or 60s. It’s now a 3 bedroom house with a total of 6 rooms. The house has a basement under the original structure and sits on a partially wooded 1/2 acre lot just outside of Benton Harbor, MI.
Most of the work that was needed on the house actually turned out to be as a result of the bank’s actions during and after foreclosure and not of the original home owners. The biggest issue is that they shut off the electric and water to the house. This house sits in a low lying area and has a sump pump in the basement floor with drainage pipes running under the basement floor to it. With no power the basement filled up with water. This caused moisture and mold issues in the house and of course destroyed the furnace which was submerged. Shutting off the well allowed for the screen to get clogged, and essentially killed the well. I also should note that this was one of the top 3 wettest years on record in our part of Michigan.
Work done:
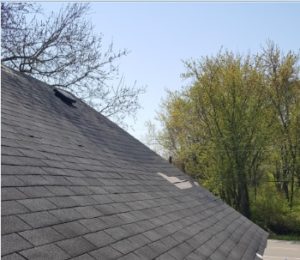
 Patched the roof: There was a small section of the roof that was missing shingles entirely. The entire house has 2 layers of shingles so I was surprised to see bare wood. In addition to patching in shingles to this spot I also added shingles throughout where pieces had ripped off. This roof was a bit steeper than what my comfort level was, I gotta hand it to the guys who do this professionally, keeping your balance is hard enough, add in moving around bundles of shingles and hammering them in and it can be down right nerve wracking. Any steeper and this job would have been hired out.
- Replaced front and side doors: The front door had been kicked in by the sheriff’s department when they foreclosed. The side door was improperly installed to begin with.
- Installed side deck: The side door had a small concrete stoop about 3.5′ X 3.5′ that had broken and was leaning substantially. I busted this out and build a 4′ X 12′ deck off the side door. This is by far the most level thing I have ever built. I built it to go directly flush under the door. Once the support board was in place along the concrete wall I was able to fill in a large hole in the concrete that was on the inside of the side door. The only thing I don’t like about this deck is that the overhang of the last board is a bit more than ideal, I may have to cut that back at some point.
- removed flooring through whole house: Due to the moisture the floating floors installed throughout the house had buckled. They had been installed with either no gap or too little gap. Under the floating floors was linoleum and under the linoleum in 2 rooms was 1/4″ OSB. under that was the actual wood floors.
- painted wood floors: After letting the floors air out and after we cleaned them we painted the wood floors. I know, it wasn’t ideal, but this was the only viable option. These floors had been painted in the past and as far as repair goes were too far gone to attempt to sand and stain them.
- re-purposed floating flooring in 3 rooms: We used the floating floors in 2 bedrooms, the kitchen and the hallway. In one of the bedrooms the floating floor never buckled so we were able to leave that one in place.
- painted entire house inside: I’m so sick of painting! The walls were all this horrible yellow/orange color and we painted everything white. My mother in law then decided she wanted the kitchen the be a “sunny” color and had us paint it almost the same color the rest of the house had been.
- Painted the kitchen cabinets: Mrs. C. spent forever on these things. These cabinets were so dark and dreary. She brought new life to them with 4 coats of paint and a protective layer of polyurethane. The only part of the house we didn’t paint was the Chicago Bulls logo that was painted on 1 wall in the back bedroom.
- ran new electric for the sump pump, well, and additional outlets: We killed the original sump pump because I’m an idiot. Due to no gutters, poor grading, and the sump pump discharging 6″ outside the house the basement had a lot of water intrusion. Everyday I would bucket this up and dump it into the sump pit. Well that water also had dirt and mud in it and eventually I clogged the pump and destroyed it. We then replaced the sump pump and when Mrs. C. set it up it was sparking on the inside of the pit. We figured it was a bad pump and returned it. The next one did the same thing. I traced the wires back and although the wire going to it had a ground, it was fed from a junction box that had no ground going to it. I then ran a new dedicated electric line for it and problem solved. I also had to run a new line for the new well pump. I added electrical outlets to the master bedroom and added lights and outlets to the attic.
- Replaced the furnace and hot water heater: The hot water heater was from 1994 but appeared much older. This thing was a 50 gallon tank and was filled with sediment. It felt like it weighed 400 pounds. It took everything a friend of mine and I had to get it out of the basement. The furnace was also older and had been submerged in water so it needed to be replaced. A friend of a friend hooked me up with a great deal and we got a new furnace installed for $950. Can’t beat that. I will certainly be calling him for future furnace replacements.
- Installed gutters: I installed gutters originally around just the part of the house that has a basement under it, and then added them for the rest of the addition. Gutter pieces are stupid expensive. The actual gutters are only about $1 per foot, but add in the connectors and hangers and it gets pricey really quick. The hangers are over $3 each and are needed every 2 feet. Anyways this helped a ton with getting water away from the house.
- regraded around the house: The grading sloped towards the house so all the water from the roof and the first 3 feet around the house drained straight into the basement/crawlspace. No wonder it was flooding! On one side of the house there was a flower bed planted with dozens of lilies that were well below grade. I had 4 yards of dirt delivered and installed it all around the house. I first built it up to a slight grade, then put down a heavy plastic 5 feet out, then I added more dirt to get the grade I wanted. After that I tamped it all down and added grass seed. Still waiting on all the grass seed to fully take.
- Drylok sealed the basement:
This was so incredibly difficult. Before putting on the drylok I used hydraulic cement to seal active leaks. This was an iterative process that I repeated several times. I put the first coat of Drylok on, but before I could get a second coat on we had more rain. The Drylok won’t work with active water intrusion. We went 6 weeks where it rained every other day. I put on a full second coat and then a 3rd and 4th coat in the most troublesome spots. Thanks to the Drylok
- Shaved swelled doors down to close properly: I had to take all the interior doors off their hinges and cut about 1/16th off of them for them to close properly. This was due to the swelling from moisture.
- Installed an Attic Access
and installed flooring and drywall to make attic usable space: This was a big project for me. When I first saw the house I noticed the upstairs window, but when Mrs. C. toured the house she said there was no upstairs and no attic access (I was working out of town when she toured the house and when we put in an offer). Unfortunately the only place to put this in was in a bedroom. I cut the hole for it and then brought in 3/4″ OSB for the floors and the drywall. FYI, 3/4″ OSB is stupid heavy. I bought one of the drywall carriers
which helped a lot, ideally this is a 3 man job though, 2 to carry and 1 to hold the door open. Once the attic stairs were installed the opening would be too small to bring up full sheets. I also installed 2 overhead lights and an electrical outlet. The space is barely semi-finished, but it is usable and I can improve upon it in the future. There is a total of 315 square feet up there. I spent under $500 on this addition. For an 850 square foot house adding 315 square feet of space is a huge win. The attic access stairs are incredibly cheap for the value they bring, Amazon has them for $99.
- Installed shower panels in bathroom. The bathroom had what looked like normal drywall, but it was a special mold resistant drywall for bathrooms. I still didn’t like it so we installed shower board. This stuff is a royal PITA. I bought a special saw blade for cutting it. I highly recommend cutting this stuff outdoors. When cut it creates a super fine dust that I’m sure is really bad to breathe in. It is also stupid loud. The bathroom is now much more water proof.
- Replaced the well/installed city water: OUCH! I really really didn’t want to do this. I originally bought a new pressure tank thinking the original 1950s model tank was the issue. When we primed the well we got water and it would pressure up, but then the volume dropped off. The problem I’m fairly sure was a clogged screen. To have our well opened and the screen replaced would cost $1,200 plus tax and we would have to remove 2 large bushes and our chain link fence for the truck to get to it, and still with no guarantee it would work. We bit the bullet and went with a new well to ensure we would be issue free for a while. This cost $5,200. They drilled the well on Monday and were planning to install through the house plumbing on Tuesday. We arrived on Tuesday and there was plenty of mess from drilling, but no well casing, and the guys didn’t show up to do the inside work. We called and found out that they drilled down 180 feet and hit no water. We then had to pay to get hooked up to city water. The combo of city water and the drilling added up to $6,600. This was over half our total expenses on the house. Needless to say, this is a major lesson learned for the future. If I can’t test running water, the price drops $5K. I also now know that a well isn’t a sure thing.
- Removed built in stove top and range and setup kitchen for freestanding range: These appliances I think had to be original to the addition. These things were ancient. I hate built in appliances because they are more difficult to fix and replace.
- Replaced 2 light fixtures: These were fairly straight forward and make the area look a lot more up to date.
- Removed tree branches over house: An old Mulberry tree over arches the side yard and had branches touching the house and going over the power lines. We paid a friend of ours to cut them back.
 Patched the roof: There was a small section of the roof that was missing shingles entirely. The entire house has 2 layers of shingles so I was surprised to see bare wood. In addition to patching in shingles to this spot I also added shingles throughout where pieces had ripped off. This roof was a bit steeper than what my comfort level was, I gotta hand it to the guys who do this professionally, keeping your balance is hard enough, add in moving around bundles of shingles and hammering them in and it can be down right nerve wracking. Any steeper and this job would have been hired out.
 Installed side deck: The side door had a small concrete stoop about 3.5′ X 3.5′ that had broken and was leaning substantially. I busted this out and build a 4′ X 12′ deck off the side door. This is by far the most level thing I have ever built. I built it to go directly flush under the door. Once the support board was in place along the concrete wall I was able to fill in a large hole in the concrete that was on the inside of the side door. The only thing I don’t like about this deck is that the overhang of the last board is a bit more than ideal, I may have to cut that back at some point.
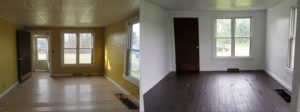 painted wood floors: After letting the floors air out and after we cleaned them we painted the wood floors. I know, it wasn’t ideal, but this was the only viable option. These floors had been painted in the past and as far as repair goes were too far gone to attempt to sand and stain them.
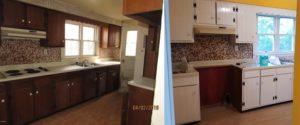 Painted the kitchen cabinets: Mrs. C. spent forever on these things. These cabinets were so dark and dreary. She brought new life to them with 4 coats of paint and a protective layer of polyurethane. The only part of the house we didn’t paint was the Chicago Bulls logo that was painted on 1 wall in the back bedroom.
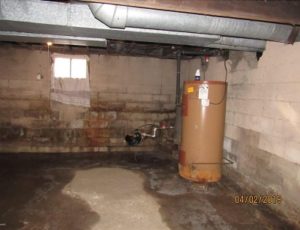 Replaced the furnace and hot water heater: The hot water heater was from 1994 but appeared much older. This thing was a 50 gallon tank and was filled with sediment. It felt like it weighed 400 pounds. It took everything a friend of mine and I had to get it out of the basement. The furnace was also older and had been submerged in water so it needed to be replaced. A friend of a friend hooked me up with a great deal and we got a new furnace installed for $950. Can’t beat that. I will certainly be calling him for future furnace replacements.
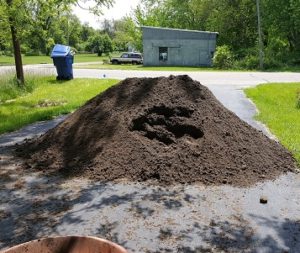 regraded around the house: The grading sloped towards the house so all the water from the roof and the first 3 feet around the house drained straight into the basement/crawlspace. No wonder it was flooding! On one side of the house there was a flower bed planted with dozens of lilies that were well below grade. I had 4 yards of dirt delivered and installed it all around the house. I first built it up to a slight grade, then put down a heavy plastic 5 feet out, then I added more dirt to get the grade I wanted. After that I tamped it all down and added grass seed. Still waiting on all the grass seed to fully take.
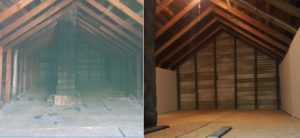 Installed an
 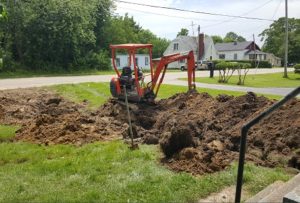 Replaced the well/installed city water: OUCH! I really really didn’t want to do this. I originally bought a new pressure tank thinking the original 1950s model tank was the issue. When we primed the well we got water and it would pressure up, but then the volume dropped off. The problem I’m fairly sure was a clogged screen. To have our well opened and the screen replaced would cost $1,200 plus tax and we would have to remove 2 large bushes and our chain link fence for the truck to get to it, and still with no guarantee it would work. We bit the bullet and went with a new well to ensure we would be issue free for a while. This cost $5,200. They drilled the well on Monday and were planning to install through the house plumbing on Tuesday. We arrived on Tuesday and there was plenty of mess from drilling, but no well casing, and the guys didn’t show up to do the inside work. We called and found out that they drilled down 180 feet and hit no water. We then had to pay to get hooked up to city water. The combo of city water and the drilling added up to $6,600. This was over half our total expenses on the house. Needless to say, this is a major lesson learned for the future. If I can’t test running water, the price drops $5K. I also now know that a well isn’t a sure thing.
Ultimately we have $32,000 invested in a house that we can rent out for $800. Mrs. C’s mom will stay here the rest of her life and then after she passes we will rent it out at market rate. After I win my next property tax appeal the property taxes here should be around $50 a month. The insurance is $45 a month. Add in $50 per month in maintenance and the net cash flow will be $655 per month or $7,860 per year. This means the house pays for itself in right around 4 years.
This house is a perfect example of why you need large cash reserves when doing real estate investing. We ran into roughly $7,000 of costs over what we anticipated. Going from an estimated $25,000 to $32,000 was a big change and if we didn’t have the extra $7,000 sitting around the project would have been delayed and could have failed entirely.
Another issue we ran into was insurance. We originally insured the house through Allstate, with all our other insurance, however when the adjuster actually came out they said they could not insure the house because it has asbestos siding. Another lesson learned. We have it insured through a different company now.
What’s Left:
I still need to touch up the paint on the exterior trim, bury a drain line for the sump pump and grow grass seed in the front yard. Mrs. C.’s mom is 90% moved in and we are starting to get Rental #1 ready to rent. Overall this was a much bigger project than what I want to be going after. With future houses we will be looking for properties not in need of as much work.
I’m really glad we did this project. This house is a turning point for us on our path the building wealth through real estate. It was a big win that Mrs. C.’s mom found a house she wanted that was half the price of the houses I was looking at for her. I learned a ton on this project that will be helpful for future houses and can’t wait to apply the new knowledge.
Have you renovated a house? What did you learn throughout the process?
Leave a Reply